Overview:
- Estimated achievement difficulty: 1/10 (with guide)
- Offline: 33 (1000)
- Online: 0
- Approximate amount of time to 1000: 6/8 Hours
- Minimum number of playthroughs needed: 1
- Missable achievements: 7 (All none secret achievements - see guide for info)
- Does difficulty affect achievements?: No
- Unobtainable/glitched achievements: None
- Extra equipment needed?: No.
Introduction:
Broken Sword: The Serpents Curse is a traditional point and click adventure game, and as such, it is pretty hard NOT to get all of the achievements as you progress through the game. That being said ALL of the non-secret (i.e. non-story) related achievements are missable - so pay special attention to getting those out of the way as and when they crop up. Failure to snag those will result in a second playthrough.
To avoid any potential mishaps, you can save at any time so feel free to make multiple saves in case you do mess up.
Many thanks to Moosh over at PST for letting me use her images for a few of the achievements.
Step 1: Play through the story
I've prepared a complete step by step guide (see here) for you to use while playing the game. With this you will get ALL achievements in one playthrough. Feel free to take your time and enjoy the plot.
Step 2: Mop Up
If for any reason you missed an achievement or one didn't pop up, then you have two options either start a new playthough - or revert to an earlier save.
Conclusion
This is a nice and easy point and click adventure that you should be able to get through in no time at all with a guide, or slightly more time without. Pay attention to the missable achievements first and foremost, as if you forget one it could mean another run through. Otherwise all story achievements will pop as you progress and cannot be missed. Enjoy.
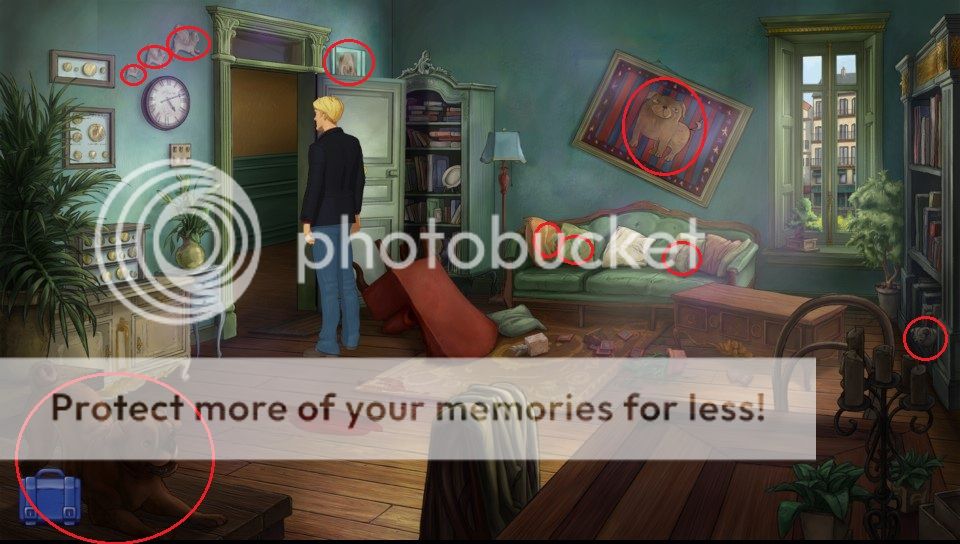
 Notorious P.U.G. - 50G
Find all the hidden pugs in the neighbours apartment
THIS ACHIEVEMENT IS MISSABLE.
When Marques vanishes you will control George in Nico's neighbours apartment. Before you do anything else you need to click on all TEN of the pugs scattered around before leaving. See the picture for locations. Credit to Moosh for the image.
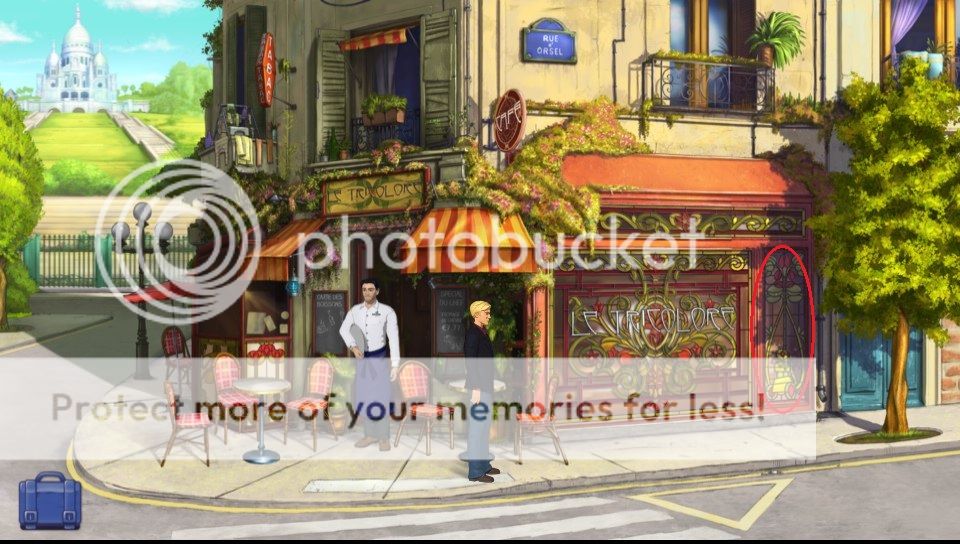
 Joey - 50G
Found all hidden Joey's
THIS ACHIEVEMENT IS MISSABLE.
Joey is a robot from another Revolution game, Beneath a Steel Sky. You actually only find him in one place - but you need to click on him (often multiple times until he talks) each time you revisit the area. He is found on the right most stained glass window of the café next to the gallery (directly to the left of the tree here). Credit to Moosh for the image.
You need to speak to him at these times:
1. At the start of the game, when you exit the gallery to get Laine's bill from the waiter.
2. When you first get control of Nico outside the gallery.
3. As George, when you come back to the gallery from Vera Security.
4. As Nico, after you let Marques stay at the neighbours place you'll head back to the gallery.
5. After you've been to London, look at Joey BEFORE you go into the gallery for the reconstruction.
6. You'll dance with Bijou and get the keys, then return to the gallery.
 Hidden Goat - 50G
Found the hidden goat
THIS ACHIEVEMENT IS MISSABLE.
After you control Nico for the first time and regain access to the gallery you will have to distract Navet. Do this and George can get into the back office. Then click on the goat that is sat on the left of the shelf at the back of the room. Credit to Moosh for the image.
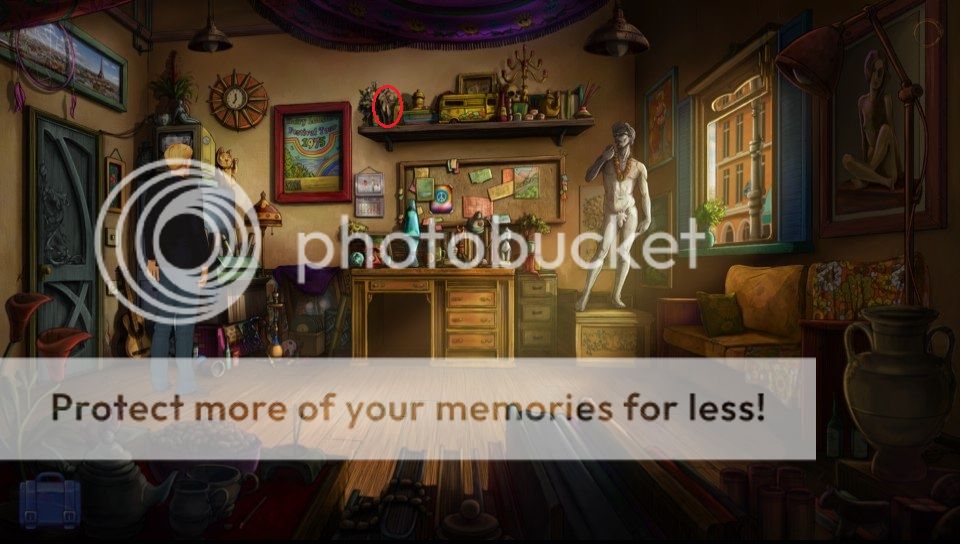
 I Call it the Dreamatorium - 50G
Won a battle in your own mind
THIS ACHIEVEMENT IS MISSABLE.
After you've helped Pearl and Duane (see below), you will access a dark room hidden in a secret passage in the chapel. You MUST do the following before interacting with the Stone Object prompt and restoring light to the room: Move the cursor to the bottom right and click on the Bottomless Pit. Select the hammer and move the cursor to the top middle and click on Figment of Imagination. Select the hammer and move the cursor to the middle right and click on Imaginary Malicious Denizen. Here is an image of the locations:

 Local Call - 50G
Chilled out to Radio Yorkshire
THIS ACHIEVEMENT IS MISSABLE.
After getting the Best Buddies achievement (see below) interact with the car next to the goat at Castell des Sants. You'll get inside. Then use Nico's press pass on the radio. Listen to the conversation and this will unlock. You can use the pass multiple times to hear other Kickstarter questions if you like.
 Super-Charged Potpourri - 50G
Nearly made Pearl faint with heavenly delight
THIS ACHIEVEMENT IS MISSABLE.
IMPORTANT: When you end up in Fleur's shop you MUST pick up some flowers from the basket in front of her to be able to unlock this later. Also DO NOT feed the flowers to the goat at Castell des Sants.
When you meet up with Pearl and Duane, do the following. Grab the wood shavings on the floor as you enter Santa Cova. Speak to Duane and ask him everything you can. Be aware you can just make regular potpourri to proceed here but you'll miss the achievement. Combine wood shavings with the flowers you got earlier. Then combine the potpourri you just made with the Eau de Toilette.
 Best Buddies - 50G
Chatted to the goat
THIS ACHIEVEMENT IS MISSABLE.
When you control George at Castell des Sants you will meet the goat. DO NOT INTERACT WITH THE GOAT YET. Try and pick apples from the tree here to get knocked down. Try again, but click to the left to dodge. Then grab the apples. Now feed the following items to the goat in order (elect them in your inventory then use them with the goat): apple, provenance, Marques scribbled photo, Rich Tea Biscuit. This sets up the achievement.
Now when you control Nico here (after solving the fireplace statue puzzle with George) come back to the goat and speak to him to unlock the achievement.
Secret Achievements
 Oh my God it's a Miracle - 20G
Found evidence of sabotage
Will unlock through natural progression.
In the first scene, as George, go to the left and look at the alarm on the wall. Open it and then examine the cut wire to get this.
 Breaking the Seal - 20G
Send Moue to the bathroom
Will unlock through natural progression.
The first time you control Nico, speak to Moue to find out he wants a drink. Then go left and speak to the waiter, show him your press card then ask for a coffee. Drink it and ask for a takeaway coffee, then give the takeaway coffee to Moue.
 Chasing your Tail - 20G
Discovered the Ouroboros
Will unlock through natural progression.
When you gain control of George in the Gallery office, go to the CCTV (top left) and use the code 2705 to gain access. Click on the painting in the first image to unlock this. You can also get the Hidden Goat missable achievement in this scene.
 Brand is Everything - 20G
Helped Bassam to name his business
Will unlock through natural progression.
When you go to Vera Security with George you will meet Bassam, talk to him about his migraine and offer to fix his neon sign. Examine it and firstly click on the loose wires (just below the letters on the left) to stop it flashing. Then rearrange the letters to form the following (including the space) SEED' ALADDIN.
 Roll 'em Up - 20G
Opened the shutter to Vera Security
Will unlock through natural progression.
When you go back to Vera Security at night examine the shutter, opener, electrical box (above the shutter) and girder over the street. Click on the wheeled box on the left side of the street once, then click on the girder and George will climb up and shinny across. Open the electrical box and turn off the switch under the power box (top right box). Then use the nail clippers to snip all three blue wires, then use the loose wire (that you got from the neon sign) to link the bottom left wire to the top right one. Hit the switch again to open the shutter.
 Ink Trail - 20G
Spotted the murderers tattoo
Will unlock through natural progression.
At Nico's apartment she will be visited by Marques who will ask to see her photos of the robbery. Examine them all, especially the third one with the tattoo that will unlock this.
 Suited and Fluted - 20G
Spill champagne on Laine
Will unlock through natural progression.
Nico will head back to the gallery and see Laine outside, sat at the café. Speak to him and make him take you to the gallery. Once in the office, sit next to him and then speak to him again. Ask for champagne and then use the glass he gives you ON him.
 Russian Evolution - 20G
Discovered Medovsky's address.
Will unlock through natural progression.
After the last achievement you head back to Nico's place. When control shifts to George speak to Nico and ask about Waterloo Motors - she will then find the phone number. Then use your mobile from the inventory to call them and get the address.
 Count Leo has the Answer - 20G
Opened Medovsky's secret drawer
Will unlock through natural progression.
When you visit Medovsky's house you gain access to his office. Examine his desk and you'll see nine symbols running across it. Press the following symbols in order (counting from the left): The fourth symbol. The second symbol. The third symbol. The seventh symbol. This will open a hidden drawer and get you the achievement.
 Water of Life - 20G
Got Hobbs drunk
Will unlock through natural progression.
At Hobbs' studio, go behind the screen to speak to Lady Piermont. Then interact with the thermostat. After Hobbs drinks, use the whisky (that you got from his van) on his empty glass. Then interact with the radio next to Lady Piermont - turn it on and the volume up. Then use the lift button on the wooden balcony. Then speak to Lady Piermont and she'll stand on the lift. Use the button again to short the fuse. Hobbs' fixes it and drinks again. Use the button a third time to get the achievement and access to his portfolio.
 CSI: Deluded - 20G
Fixed the forensic machine
Will unlock through natural progression.
When you enter the art gallery to do Navet's reconstruction do the following. Speak to Laine then try to leave. Navet tells you off. Speak to Navet about the machine. Then go left and unplug it. Speak to Navet again and he will move. You can now fix the machine by pressing the switches in the following order (counting from the left): Switch 1, Switch 5, Switch 4, Switch 3. Then press the red power button.
 Boogie Nights - 20G
Danced with Bijou
Will unlock through natural progression.
To dance with Bijou to need to speak with her and find out her record was broken. Go back to Vera Security and speak to Bassam. Examine the music cards on his stall and ask him about them to get the right one. Head back to Bijou's and give her the card to make her dance. Then use her dressing table. Grab the wax strips then stand back up. Go right and use the wax strips on the stuffed dog, and grab the white flower from Henri's dead body. Go back to the dressing table and use the following: Use the brown eyeshadow (left of mirror) to alter your hair colour. Use the waxed dog hair on George's mouth. Use the glasses from Henri's office on your eyes. Use the white flower on your lapel. Use the Eau de Toilette on your neck. After you dance and she passes out the achievement will pop.
 Diamond Geezer - 20G
Cut your way out of the office
Will unlock through natural progression.
You'll head to the gallery office to find the provenance. Use Bijou's key to enter the gallery and then the office. Access the safe by using the fig leaf on the statue and then the key. Grab the documents and then use the Ouroborus sketch with the provenance when you move to the table - revolve them so the coffee stain matches. You'll get trapped in the room. Go back to the safe and grab the diamond ring then use it on the window to escape.
 Fountain of Youth - 20G
Presented the Manneken Pis to Moue
Will unlock through natural progression.
In Fleur's shop you need to distract Moue. IMPORTANT: Grab some flowers from the basket below Fleur before you do this as they are needed later. Speak to Adam and give him the coin from Medovsky's to get rid of him. Interact with his CD player, press stop and eject, and then grab the CD and the batteries from inside. Use the CD on the radio to the right of Fleur and turn up the volume. Then examine the boxes on the far right to get the Pis statue. Use the batteries and whisky on the statue - then use the statue on the trolley near the door. Finally interact with the trolley.
 No Parlo el Catala - 20G
Decrypted Hobbs' map
Will unlock through natural progression.
When you head back to Hobbs' place at night you will break in and head up to his room. AT the back of his room is a pinboard with various images. Examine them all and then select Castell des Sants, which is the red icon on the top right of the map.
 The Mystery Deepens - 85G
Completed Part 1
Will unlock through natural progression.
After examining the pinboard you will have to escape from Hobbs' place. Grab the diet coke from under the phone and the mints from Hobbs body - then combine them. Use them on the skylight above you to open it. Then combine the crowbar (that you found outside) and the dust sheet (that was covering a painting in the room below) to make a grapple - then use that on the skylight to escape and end part one.
 Order of the Goat - 20G
Outwitted the goat
Will unlock through natural progression.
When you meet the goat do not interact with it just yet. Instead try and pick apples and you'll get knocked down. Interact with the tree again but this time click to the left to dodge. Grab the fallen apples. (Be sure to first feed an apple, the provenance, the scribbled photo and the rich tea biscuit to the goat IN THAT ORDER for a later achievement). Then use an apple on the bottles behind the goat to distract him. When he moves interact with the tyre he is tied to. Then pick up the side mirror from the car.
 Bons Hommes - 20G
Found the route the fleeing Cathars took
Will unlock through natural progression.
When you switch back to George in the hidden shrine (after Nico has found the library key and accessed it) you need to interact with the raised hand on each statue. On the left side, remove the leather cover and revolve the lens to let green light through. On the right side, remove the leather cover and revolve the lens to let blue light through. Then use matches on the candelabrum in the middle of the room, then use the medallion on the candelabrum.
 X Marks the Spot - 20G
Discovered the hiding place of Tabula Veritatis
Will unlock through natural progression.
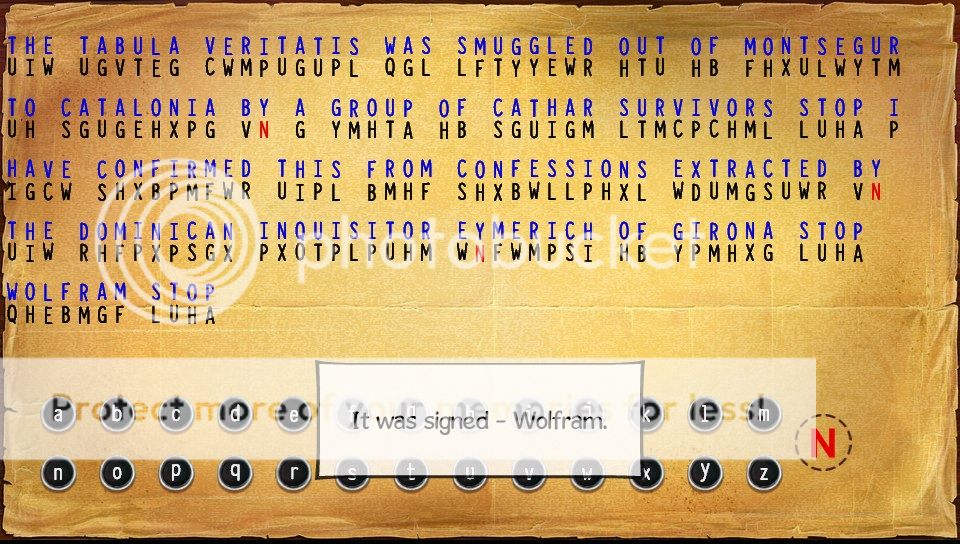
After the last achievement you'll be back in the main room. Grab the painting of La Meladiccio. and then examine the left most shield on the wall. Head to the library via the left most door. After some conversation examine the trunk and remove everything until you get a note. Examine it and click on a letter on the note then a letter below - in order to spell the following: The Tabula Veritatis was smuggled out of Montsegur to Catalonia by a group of Cathar survivors STOP I have confirmed this from confessions extracted by the Dominican inquisitor Eymerich of Girona STOP Wolfram STOP.
So it looks like the following:
Now look at the map and pick up the pins from the bottom and place the in the following locations:
Monsegur, Berga, Sant Roman and Girona.
 Hot Wire - 20G
Get the cable car working
Will unlock through natural progression.
When you arrive at Montserrat ignore the guards and head to the bottom right to exit. Then try and use the door on the left to get a brief scene, Eva leaves. Now head left and use the telescope. First look at the cable car and examine it then look left and examine the face on the rocks. Back out and use the car mirror with the glint on the cable car. Use the telescope again and examine the cable car to get the code. Now go back to the door and enter. Inside interact with the lunchbox next to the first counter to pick it up and then interact with the cupboard door behind it to speak to Kat. Use the lunchbox on the cogs on the bottom right of the screen and go and use the lever on the console to the left side. Pick up the lunchbox again to get the radio and after some chat use the radio on the cupboard door so that Kat will exit and open a hatch in the left hand console. Head back to the broken lunchbox and use your paperclip on the jam then use the sticky paperclip on your matchbox. Examine the hatch. Use the rich tea biscuit on the prongs in the lower right side and finally use the matchbox on the front of the hatch to set the cockroach loose.
 The Truth to the Grave - 20G
Found the Tablet of Truth
Will unlock through natural progression.
After you help Pearl and Duane they will leave. Now use the hammer on the lefthand altar to reveal an image. Then head to the right and grab a votive candle from the huge rows of them. Go back to the altar and use the candle on the recess to the left of the image of Mary and use the matches on the candle/recess. Then interact with the Ouroborus image to open a passage an you'll head inside.
IMPORTANT: Be sure to get the Dreamatorium achievement before doing anything else.
Once that is done, interact with the Stone Object prompt on the right side. Then use matches on the stone object to light the room. Examine the table and pick up the artefact next to the body.
 Gravity Depravity - 20G
Got rid of the guards blocking your path
Will unlock through natural progression.
After escaping the locked room the Tabula was in, you'll come across Langham again. Use the revolver on him and then speak to him. Tell the truth - then he leaves. Go right and out onto the balcony. Use the drainpipe and go down. Use the radio on the drain at the bottom. George automatically climbs back up. When the guard gets close, use the hammer on him to knock him out. Then go back into the chapel and through the exit to the cable cars.
 Philosophy 101 - 20G
Persuaded Shears to help you
Will unlock through natural progression.
After Santa Cova you'll be hanging onto a cable car. Use the yarn on the door to gain entry and then interact with the window Nico is stood at. You'll talk to Medovsky and then switch to Nico. As Nico just speak to Shears and go through every dialogue option until he helps you.
 Balance - 20G
Have a dream
Will unlock through natural progression.
After the cable car sequence you'll be on a plane and George will have a dream - once the dialogue is over this will unlock.
 Cry Havoc - 20G
Let slip the goats of war
Will unlock through natural progression.
When you end up outside Eden (after the plane trip). Go to the left and to the path up the hill by the truck. George will see guards and come back to talk to the others. Interact with the truck and pick up the knapsack. Use the knapsack with Shears then pick up the dynamite, TNT, fuse wire, duct tape, lighter (back pocket) and sausage. Combine the fuse wire and sausage. Use the fake Dynamite Sausage on the goat to the right then use the lighter on the goat. Grab some figs from the tree above the goat and use figs on the guards (just walk left to where Shears is), on the lower path (the columned area to the right of the guards) and on the path (arch by the truck).
 What just happened there? 85G
Saved the world!
Will unlock through natural progression.
You'll end up at Eden. Once the guards move, look at the dark hole at the back of the screen. Use the lighter on the hole. Whoops - Nico takes some of our stuff then use the lighter on the hole again to enter. Once inside, use the lighter on the dead bush just to your right. Use the Eau de Toilette on the same bush and then use the ladder that falls. Talk to Langham and you'll switch to Nico. Use the ladder to cross over and then use the dynamite on the crack to the right of the altar/Tabula Veritatis.
Howdy folks,
WALKTHROUGH
Guide is now complete.
Any issues or corrections then just let me know. I will try and NOT mention the story or post any spoilers except for where it is required in order to further your progress. So obviously don't read too far ahead if you haven't played the game yet. Fair warning.
Away we go:
Le Lezard Bleu - Art Gallery
You control George to begin with. Highlighting any object will allow you to interact with it, so talking with people or examining/picking up items etc, or you can just click on the floor and side of the screen to walk. That's about it. Pressing Y will open your inventory, then you can pick objects from there to use them with each other OR the people you meet. Some objects will also pop up as a conversation option when talking to people.
Generally when you are talking with folks, try and go through EVERY option. As that way you get more story and will unlock further clues, locations etc. I'll tell you the options you have to pick though (or at least the ones I did). Tutorial over, let's begin.
Talk to the Priest by the dead body to move him.
Examine the body. Check the note under his left hand, then grab the Eau de Toilette (purple bottle) from his pocket. Stand up.
Go to the left wall and look at where the painting was. Check the price label and examine the alarm itself.
Open the alarm door and check the cut wire. Achievement unlocked - Oh my God it's a Mirage!
Check the pressure pads and test the alarm button, then back out.
Check the nearby paintings to compare prices and test their alarms.
Look at the CCTV camera above the door next to you and then the door itself.
Go right. Open the pizza box on the table and grab the pizza inside.
Interact with Laine (slumped on the floor) and use the Eau de Toilette to wake him.
Grab the Nail Clipper that he drops.
Talk to him, then use the pizza on him to talk again. Exhaust all options and then use the nail clippers on him.
Exit the gallery.
Go left and look at the right most window of the café to see a yellow robot on the stained glass (to the direct left of the tree). This is Joey and you need to click on him a few times until he speaks, keep clicking until he stops talking. Achievement progress 1/6 - Joey.
This image has been resized. Click this bar to view the full image. The original image is sized 960x544.
Then speak to the waiter at the café and mention Laine, you get his unpaid bill.
Head back to the gallery and use the bill on Laine to get the door code.
The police, Navet and Moue, arrive before you can use it.
Switch to Nico. Outside the Gallery.
Talk to Sgt Moue at the door about Navet and learn that he is tired and wants a drink.
Go left and again click on the Joey image until it talks. Achievement progress 2/6 - Joey.
Talk to the waiter. When done show him your press card and talk again.
Ask for a coffee, then ask for a takeaway coffee.
Then head right and give that takeaway coffee to Sgt Moue, who will drink it after a long discussion. Achievement unlocked - Breaking the Seal.
Back inside the Gallery.
You will automatically talk to Navet and George.
Head left and pick up the pizza box.
Examine the tomato sauce on the floor and interact with it to smear it.
Use your press card on the chewing gum.
Talk to Navet to distract him.
Switch to George. Inside the office.
First of all there is a shelf right above the desk in the back/middle of the room. Click on the left side of that shelf to spy a goat statue. George will make a comment about evil being present and a second or two later. Achievement unlocked - Hidden Goat.
Examine the calendar to see the date May 27th.
Look at the desk, then open the drawer at the bottom.
Click on the file to pull it out, then examine it again to get the Vera Security Completion Note.
Now click on the CCTV (TV in the top left of the screen) and enter the code 2705 to get access. Use the buttons at the bottom to go forward/back between frames. Click on the following objects in various frames:
- click on the La Malediccio painting itself. Achievement unlocked - Chasing your Tail.
- click on the thief.
- click on Henri, the thief and the alarm.
- click on the thief again when he is close up to get the name Waterloo Motors.
Then click on George checking the alarm, and just skip through the remaining frames.
Now examine the statue on the right and "interact" with the fig leaf. Heh heh! It opens a safe.
Then examine the waste basket to the left of the desk to find out about Henri's credit problems and get his address.
Navet will then enter and talk to you.
Choose the LIE option, then discuss the CCTV and Vera Security.
You will automatically end up having coffee with Nico. Pick all dialogue options until you split up.
As George, head to Vera Security.
Vera Security.
Go down the alley and talk to Bassam on the right by his stall. Ask about his headache and offer to fix his sign.
Now examine the neon sign just above/to the left of where the guy is standing.
You need to fix it AND spell a new name.
First grab the loose wires below the letters on the left side, it stops them flickering.
Now you need to just move the letters so they spell the following (with the space) SEED' ALADDIN. The word Aladdin should be lit up on the right side. Achievement unlocked - Brand is Everything.
Now go into Vera Security on the left side of the street.
The woman asks you to get rid of the cockroach.
Look on the small table on the right. Move the cigarette packet and pick up the matches.
Examine the cockroach and use the matchbox on it. But it doesn't work.
Head back outside and speak to Bassam again about the cockroach to get a Rich Tea Biscuit (the worst of ALL biscuits).
Go into your inventory and combine the biscuit and matchbox.
Head back to Vera Security and examine the roach again, then use the matchbox on it. Once it goes inside, pick up the matchbox again.
Now speak to the woman, Annette, and ask about the gallery, she denies everything so show her the Completion Note.
Try to use the door behind her.
Go to your inventory and use your phone to call Vera Security. When she answers, quickly turn off the radio that is at the end of the counter (directly left of the door you came in).
Annette will move to turn it back on, so quickly grab the black book next to the phone she answered to get a photo of her and Laine.
Talk to her again about all options, then go to find Laine.
Head back to the Gallery.
Examine the Joey window again until it talks. Achievement progress 3/6 - Joey.
Talk to the waiter and ask about Laine, show him the photo of Laine and Annette too for more information.
Now go right and click on the Metro steps to bring up the map screen, then head to Henri's apartment.
Henri's Apartment.
Go down the street and use the intercom on the door on the right, then blackmail Laine into letting you upstairs.
Speak to Laine again once you're upstairs and show him the photo with Annette. Go through all options until he leaves.
Speak to Bijou, the woman on the sofa about everything.
Examine the central painting above the record player to see the birthmark. Examine Henri's coffin. Examine the stuffed dog to the left of the coffin. Try and examine the desk and music box on the left side.
Then speak to Bijou again about everything you can before leaving for Vera Security again.
Vera Security (night)
Examine the shutter, shutter control, electrical box (above the shutter) and girder (above the street).
Then interact with the wheeled box on the right side ONCE. Then interact with the girder and George will climb up and shimmy across.
Open the electrical box and firstly turn off the switch at the bottom of the power box in the top right.
Then use the nail clippers to cut all three blue wires.
Use the loose wire you got from the neon sign to connect the bottom left cut wire to the top right one (so the power box to the shutter control box) and then turn the switch back on so the shutter will open. Achievement unlocked - Roll 'em up.
Head inside Vera Security.
Examine the small table drawer on the left and pick up the Q-Tip inside.
Use the other door in here to enter a dark room.
Go into your inventory and use a match on the matchbox to find the light switch (to the left of the door) and then turn that on.
Examine the scooter and use the Q-Tip on the oil on the floor here.
Look at the shredder to see it is jammed.
Interact with the lid on the right side of the shredder to open it, then use the oily Q-Tip on the gears. Then press the green button.
You now need to piece together the letter. Firstly grab the paperclip in the top right though. This is pretty easy, but do note that you need to grab the bigger pieces in the middle to move them (that stumped me for a second for some reason, ha ha). Use the La Lizard Bleu logo in the top right of the letter as a starting point.
Once you have the letter look at the air vent on the left side.
Use the paper clip on the vent and examine it to find the gun.
Navet turns up to spoil your day. What a douche.
Nico's Apartment.
Back to Nico. You'll have an automatic conversation with your editor and then an old man, Marques, will turn up. Talk to him about everything and then show him your photos.
Click on each in turn for more information. The third one, with the tattoo, will be most important. Achievement unlocked - Ink Trail.
You'll then head to the neighbours apartment.
Examine the doormat to find the key is gone.
Use the press card (with gum still attached) on the now revealed crack in the floor to get the key and let Marques into the apartment.
Nico will then automatically leave after a brief conversation.
Head back to the gallery (again).
As Nico, examine the Joey window again until it talks. Achievement progress 4/6 - Joey.
Speak to Laine and get him to go to the gallery with you.
Once in the office, sit on the sofa and speak to Laine. Ask for champagne, then use it ON him to spill it. Achievement unlocked - Suited and Fluted.
When he stands up, grab the folder that was underneath where he was sitting to find out the supposed owner is Medovsky.
Now leave the gallery. You'll automatically be back at Nico's place.
Nico's Apartment
More automatic conversation with the editor, George and Marques here.
When he shows the picture examine the painting, mantelplace statues and each family member. Marques will show you his medallion as proof.
You'll switch to George, so talk to Nico again to track down Waterloo Motors.
Also, call George's boss Rickenbacker. Then call Waterloo Motors to find out Medovsky's address. Achievement unlocked - Russian Evolution.
Time to head to England. Navet won't be happy.
London - Medovsky's house
You'll control Nico at first.
Speak to the gardener, Shears, about getting in. He brushes you off, so examine the topiary he is working on and then speak to him again about it.
Select the GOOD (thumbs up) and Eagle options when you get the chance.
Ask about Medovsky again and he will take you inside after speaking to him.
Inside Medovsky's house
Medovsky will talk to you. Select the hard (brick) option to get him to open up. Ask him every option until Hobbs (his art restorer) turns up and Medovsky leaves. Time for some snooping.
There is a Cigarette Box with a broken catch on the table.
Examine the cabinet in the back/left side.
Examine the card in here to get Hobbs address, then the note next to it.
Look at the copy of War and Peace and grab the coin next to it. You can also examine a bunch of other objects around the room for future talking points if you like.
Examine the Cigarette Box on the central table and use the coin to open it and grab the key. Examine the cigars too.
Use the key on the left hand doors to open them. After some chat you can head inside.
Inside Medovsky's Office
You can examine the art and open drawer but there is nothing of note. The real puzzle is the desk. It has NINE cryllic letters running along it, you need to press the ones that match with the War and Peace publication date (1869) which you can figure out by looking at the cryllic typewriter in the last room.
To make it easy press the following (from left side) in order:
The fourth symbol.
The second symbol.
The third symbol.
The seventh symbol.
A hidden drawer will unlock, so examine its contents. Achievement unlocked - Count Leo has the answer.
Medovsky will then return, so speak to him about anything you want and then leave.
Hobbs' Studio
You'll automatically end up here. So try and knock on the door. Then examine the mailbox to the right of it and grab the envelope.
Examine the envelope in your inventory again to open and read it, it's from a Modelling Agency.
Then look at the drain pipe, dumpster and junk piles. This should prompt a call from Navet.
Look at the cab of the run down van.
Inside grab the whisky on the left, then press the horn. No joy. So press the bonnet catch that is just under the steering wheel.
Examine the front of the van to look under the bonnet. You need wires.
Back out and look in the junk pile to get two wires.
Use the nail clippers to make two short wires from one of the longer pieces.
Examine the van bonnet again.
Use a long wire to connect the two bottom corners, then a short wire up each side to connect those. The horn now works.
Examine the cab of the van and press the horn.
Hobbs will emerge. Use the Modelling Agency letter on him and he will let you inside.
Use the now unlocked door.
Hobbs' Studio
You'll automatically speak to Hobbs and Nico will sit on the floor.
Click on the screen behind Nico to meet Lady Piermont again.
Speak to her when she moves out from behind the screen.
Examine the thermostat (it's to the right of the double door).
Use it again after Hobbs berates you.
Use the whiskey bottle you got from the van on the glass next to Hobbs.
Examine the radio to the left of Lady Piermont.
Turn the power on, then the volume up.
Press the lift button - to the right of the door above Lady Piermont. Hobbs complains.
Speak to Lady Piermont and get her to stand on the lift.
Press the lift button again. It gets stuck and blows the fuse and Hobbs goes to fix it.
Once he returns to the easel press the lift button again. Achievement unlocked - Water of Life.
Once the fuse goes this time, quickly click on the portfolio (to the lower left of the easel Hobbs was stood at).
Examine the pictures and go through the pages until you get to the Ouroborus. Take the sketch.
You'll talk to Hobbs - pick the teddy bear (soft) option when you can.
Go through everything and learn about the provenance and Laine. Back to Paris.
Le Lezard Bleu - Art Gallery
You'll get a map of Paris, select the gallery.
BEFORE entering the art gallery click on the Joey image once again until it talks. Achievement progress 5/6 - Joey.
Now head into the gallery. You'll be accosted by Navet then speak to Laine.
Try to leave but Navet will stop you, then ask him about fixing the machine.
Go left and unplug the machine, then speak to Navet again.
Once he moves you can fix the machine for him.
To do so all lights must be green - hit the switches in the following order (counting from the left side):
Switch 1, Switch 5, Switch 4, Switch 3. Achievement unlocked - CSI: Deluded.
You'll speak to Navet again, then Nico when she enters.
Then go into the office and pick up the glasses from the statue on the right.
Go back and speak to Navet and you'll lay down.
Speak to Father Simeon about everything you can, then show him the Ouroborus sketch.
He'll leave and Langhan will arrive. You'll be pulled into an automatic conversation with him.
Once done, head to Bijou's apartment.
Bijou's Apartment
Buzz the intercom and head upstairs.
Speak to her about the broken record and learn the song name, Jasmine.
Exit and head to Vera Security.
Vera Security
Speak to Bassam about his stall.
Examine the music cards on the stall.
Speak to Bassam again about the music cards and he gives you one that plays Jasmine.
Head back to Bijou's.
Bijou's Apartment
Buzz the intercom and head upstairs.
Give the music card to Bijou and she'll start to dance. Time to disguise ourselves.
Sit at her dressing table.
Grab the wax strips on the lower left, then stand up.
Go right and use the wax strip on the stuffed dog (to the left of the coffin).
Grab the white flower from Henri's corpse (classy).
Go back and sit at the dressing table then do the following.
Use the brown eyeshadow (left of mirror) to alter your hair colour.
Use the waxed dog hair on George's mouth.
Use the glasses from Henri's office on your eyes.
Use the white flower on your lapel.
Use the Eau de Toilette on your neck.
Now you can dance with a crazy old lady that you've fooled (you bad person).
She will give you the key, then pass out. Achievement unlocked - Boogie Nights.
George will head back to the gallery.
Le Lezard Bleu - Art Gallery
Father Simeon will be at the café and start a conversation, discuss everything.
BEFORE going back into the gallery check the Joey window for the last time. Achievement progress 6/6 - Joey. Achievement unlocked - Joey.
Use the key from Bijou to enter the gallery, then head into the office.
Use the fig leaf on the statue to reveal the safe, then the key to open it.
Read the note from Hobbs and grab the paperwork.
George will move over to the desk.
Place Hobbs' Ouroborus sketch next to the provenance.
Then revolve them until the coffee stain matches at the top.
You'll then get stuck in the room.
Go back to the safe and grab the diamond ring.
Use the ring on the window to the left to escape. Achievement unlocked - Diamond Geezer.
Go back into the gallery to find Father Simeon.
Talk to him and then take the papers from his hand, examine them.
Laine will then enter and talk to you.
Nico then calls and you leave.
Nico's Neighbours Apartment
You'll enter and chat with Nico then she leaves.
BEFORE you do anything else click on all ten Pug images in the room (see the picture). There are three above and to the left of the door, one right behind the door, one on the big picture on the back wall, three on cushions on the sofa, one at the front left and one on the bottom shelf on the right. Achievement unlocked - Notorious PUG.
Now check the overturned red chair to get Marques Medallion.
Check the mess on the floor to get a family photo.
Check the sofa to get a scribbled photo.
Inspect the blood on the floor.
Nico returns and after some conversation you leave.
Fleur's Shop
Speak to Fleur to get a ball of yarn.
Adam enters. Speak to him and show him the coin you got earlier.
He takes the coin and leaves.
Speak to Fleur about Nico.
IMPORTANT: Take flowers from the basket below and to the left of Fleur. Achievement progress - Super-Charged Potpourri.
Speak to Nico about Moue.
Examine the CD player that Adam left. Press stop and then eject. Take the CD.
Examine the battery cover, then take the batteries as well.
Use the CD on the stereo to the right of Fleur.
Examine the boxes of stuff on the far right.
After some musing George will find the Mannekan Pis statue, pick it up.
Go to your inventory and combine the batteries with the Pis statue.
Then combine the whiskey with the Pis statue.
Then use the Pis statue on the trolley near the door.
Use the trolley to push it outside. Achievement unlocked - Fountain of Youth.
Bijou's Apartment
You'll head here automatically, buzz the intercom and head up.
Speak to Bijou about every option - using Hobbs note from the gallery to make her more cooperative.
She will tell you everything eventually, then you will go to London automatically.
Hobbs' Studio (outside)
You'll automatically pick up the chain.
Pick up the crowbar to the left of the van.
Knock on the door then use the horn in the van.
Climb the drainpipe and get attacked by the bird.
Speak to Nico and ask her to use the horn.
Once the bird moves, use the crowbar on the crane where it was sitting to get inside.
Hobbs' Studio (inside)
Click on the sheet covering the easel in the middle of the room.
Go up the wooden steps at the back, and use the chain on the blue door.
Enter the new room.
Check the flashing phone to find out about Medovsky.
Check the cabinet under the phone to find some diet coke.
Look at the painting to the left of the door you came in through.
Use the crowbar on the painting to get La Malediccio.
Head right to see Hobbs.
Take the mints from his pocket (what is George's problem?).
Examine the empty painting.
Examine the pinboard on the back wall (to the left).
Look at the images and then select Castell des Sants (it's in the top right). Achievement unlocked - No Parlo el Catala.
Time to leave so check the skylight first.
Combine the diet coke and the mints in your inventory.
Use the trembling coke on the skylight.
Combine the crowbar and dust sheet.
Use the newly made grapple on the skylight to escape.
After some more chat that is the end of Part 1. Achievement unlocked - The Mystery Deepens.
Castell des Sants - Outside
As Nico grab the helmet from the floor to the left of you.
Combine the helmet with the mop in your inventory.
Use the new combination with the crumbling wall above you.
As George you'll meet an old nemesis.
IMPORTANT do NOT click on the goat as he will eat random items that you may need.
Try and pick some apples.
Interact with the tree a second time, but quickly click again to the left of you to dodge.
Pick up the apples.
Now give the goat the following items (in this exact order):
Apple, Provenance, Marques Scribbled Photograph, Rich Tea Biscuit. Achievement progress - Best Buddies.
Now use an apple with the brandy bottles behind the goat.
Once he moves to eat it, interact with the tyre he is tied to.
Now pick up the side mirror from the car (left of its door). Achievement unlocked - Order of the Goat.
Use the mirror with the sun.
Talk to the old man about everything.
Talk to Eva about everything, show her La Meladiccio.
Castell des Sants - Inside
Feel free to speak to Marques and examine the painting.
Go left and grab the green statue.
Go through the left hand door.
Grab the broken green statue on the stone ledge.
Go back into the last room and then out the main doors.
Speak to Nico and Eva if you like.
Grab the blue statue on the right and the broken blue statue on the fountain.
Go back inside.
Examine the painting.
Use the full blue statue on the right plinth and the broken green statue on the left one.
Revolve the blue statue so it faces towards you and the green one so it faces the wall.
You'll switch to Nico who will grab a piece of paper and speak to Ramon about the library and everything else.
Head outside and past Eva to the old car.
Speak to the goat. Achievement unlocked - Best Buddies.
Use the car door to climb in.
Use the press pass on the radio. Achievement unlocked - Local Call.
(You can keep doing this to hear different questions asked by the Kickstarter backers if you like).
Click on the pillow on the left to move it.
Click on the diary.
Click on the empty sardine cans/keys.
Go back to the courtyard with Eva.
Examine the wind chime on the back left.
Click on the sardine can (on left side near the top of the chime) to get the key.
Head back inside and go left, click on the door.
Use the key on the library door to enter.
Examine the trunk.
Pick up the map.
You'll switch to George.
Examine the statues.
Look at the lens on the left hand statue (at the top, in its hand)
Look again and then remove the leather cover when you get a close up.
Spin the lens until green light comes through.
Look at the lens on the right statue until you see it close up.
Remove the leather cover again and revolved the lens until blue light comes through.
Use the matches you have on the candelabrum in the centre of the room.
Use the medallion on the candelabrum. Achievement unlocked - Bons Hommes.
Back in the main room
Grab the painting of La Meladiccio.
Examine the left most shield on the wall.
Head to the library via the left most door.
After some conversation examine the trunk and remove everything until you get a note.
Examine it and click on a letter on the note then a letter below - in order to spell the following: The Tabula Veritatis was smuggled out of Montsegur to Catalonia by a group of Cathar survivors STOP I have confirmed this from confessions extracted by the Dominican inquisitor Eymerich of Girona STOP Wolfram STOP.
Now look at the map and pick up the pins from the bottom and place the in the following locations:
Monsegur, Berga, Sant Roman and Girona. Achievement unlocked - X Marks the Spot.
There will be a bunch of chat then you are trapped.
Examine the bullet hole then interact with it.
You'll leave Castell des Sants.
Monserrat
Ignore the guards and head to the bottom right to exit.
Use the door on the left to get a brief scene, Eva leaves.
Head left and use the telescope.
Look at the cable car and examine it.
Look left and examine the face on the rocks.
Back out and use the car mirror with the glint on the cable car.
Use the telescope and examine the cable car again to get the code.
Go back to the door and enter.
Interact with the lunchbox next to the first counter to pick it up.
Interact with the cupboard door behind it.
Use the lunchbox on the cogs on the bottom right of the screen.
Go and use the lever on the left side of the screen.
Pick up the lunchbox again to get the radio.
After some chat use the radio on the cupboard door.
Kat will exit and open a hatch in the left hand console.
Go back to the broken lunchbox and use your paperclip on the jam.
Use the sticky paperclip on your matchbox.
Examine the hatch.
Use the rich tea biscuit on the prongs in the lower right side.
Then use the matchbox on the front of the hatch to set the cockroach loose. Achievement unlocked - Hot Wire.
Santa Cova
You'll head down the cable car.
Head left into the top most door of the chapel.
Grab the wood shavings on the floor as you enter.
Speak to Duane and ask him everything you can. Also try and speak to Pearl and then speak to Nico about her. Speak to Duane again about whistling, then exit the conversation.
Important: You can just make regular potpourri to proceed here but you'll miss an achievement, if you have the flowers from earlier (and you should have) then be sure to use them here.
Combine wood shavings with the flowers you got earlier.
Then combine the potpourri you made with the Eau de Toilette. Achievement unlocked - Super Charged Potpourri.
Go right and use the toolbox to the right of the scaffold.
Pick up the hammer.
Pick up the turpentine in the middle of the scaffold.
Use the turpentine on one of the dangling paint cans (remember which one).
Now use the hammer on the following objects (in this order):
Oil Drum, Paint can with turpentine, Oil Drum, Fire extinguisher, empty Paint Can, Oil Drum.
Nico will repeat the pattern as well.
Use the crank handle to the left of where you came in to lower the candles.
Use matches on the candles.
Use the car mirror on the candles.
Use the yarn on the car mirror/candles.
Use the crank again.
Go left to the altar and spot the builders mug.
Use Super Charged Potpourri on the mug.
Use matches on the mug.
Duane will sing to Pearl, speak to him again.
After the scene talk to Pearl about everything, be sure to use the sketch of the Ouroborus on her and the La Malediccio painting too. Then select the topics that come up.
Use the hammer on the left hand altar to reveal an image.
Head to the right and grab a votive candle from the huge rows of them.
Go back to the altar and use the candle on the recess to the left of the image of Mary.
Use the matches on the candle/recess.
Interact with the Ouroborus image to open a passage.
You'll head inside.
IMPORTANT: Do not interact with any other objects before doing the following as the next achievement is missable.
Do the following in darkness.
Move the cursor to the bottom right and click on the Bottomless Pit.
Select the hammer and move the cursor to the top middle and click on Figment of Imagination.
Select the hammer and move the cursor to the middle right and click on Imaginary Malicious Denizen. Achievement unlocked - Dreamatorium.
Here's an image to help you find them:
Once that is done, move the cursor to the right side and search for Stone Object. Examine it.
Use matches on stone object. The room lights up.
Examine the table with the corpse.
Pick up the artefact. Achievement unlocked - The Truth to the Grave.
Pick up the map and photograph.
Use the map with the lamp on the table.
Use the photograph with the Tabula Veritatis.
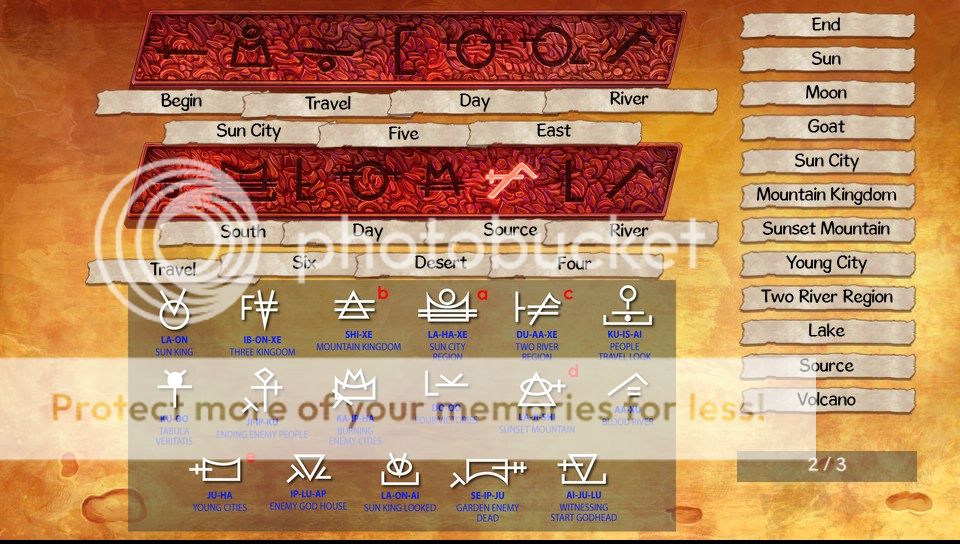
Now you have to solve the puzzle by clicking on each image and selecting the correct word from the list on the right side (there are three pages of words to chose from).
From left to right the images should spell out the following: Begin Sun City Travel Five Day East River Travel South Six Day Desert Source Four River
Here's an image to assist you:
After some chat look at the lamp again.
Use the medallion with the topmost filigree frame. Light should hit the right hand figure.
Now interact with the statue of Mary at the back of the room until it faces right.
Press the secret button (in the middle of the figures).
Go back to the lamp and pick up the medallion.
Use it on the bottom right frame this time. Light should hit the left hand figure.
Interact with the Mary statue again until it faces left.
Press the secret button.
Go back to the lamp and grab the medallion.
Use it on the bottom left frame. Light should hit the wall below the figures.
Interact with the Mary statue so it faces forward.
Hit the secret button to open the exit.
Go back to the lamp and pick up the medallion and revolver. Then exit the room.
After some chat use the revolver on Langham.
No matter what you will have to choose the truth option so do so. He will leave.
Go right and exit to the balcony.
Use the drainpipe and go down.
Use the radio on the drain.
George will climb back up and speak to Nico.
When the guard stops at the bottom use the hammer on him. Achievement unlocked - Gravity Depravity.
Now go back inside the chapel and exit the door to head to the cable cars.
Cable Car
Pretty short section here. From the outside of the cable car use the yarn with the door on the right.
Once inside try to use the window Nico is stood at.
Medovsky will show up and chat with you.
When it switches to Nico, speak to Shears.
Go through ALL options until he helps you. Achievement unlocked - Philosophy 101.
You'll end up on a plane and George will have a dream. Achievement unlocked - Balance.
Mesopotamia/Iraq/Eden
Go left and to the path up the hill by the truck.
George will see guards and come back to talk to the others.
Interact with the truck.
Pick up the knapsack.
Use the knapsack with Shears.
Pick up the dynamite, TNT, fuse wire, duct tape, lighter (back pocket) and sausage.
Combine the fuse wire and sausage.
Use the fake Dynamite Sausage on the goat to the right.
Use the lighter on the goat.
Grab some figs from the tree above the goat.
Use figs on the guards (just walk left to where Shears is).
Use figs on the lower path (the columned area to the right of the guards)
Use figs on the path (arch by the truck). Achievement unlocked - Cry Havoc!
Once the guards move, look at the dark hole at the back of the screen.
Use the lighter on the hole. Whoops - Nico takes some of our stuff.
Use the lighter on the hole again to enter.
Once inside, use the lighter on the dead bush just to your left.
Use the Eau de Toilette on the same bush.
Use the ladder that falls.
Talk to Langham.
You'll switch to Nico.
Use the ladder to cross over.
Use the dynamite on the crack to the right of the altar/Tabula Veritatis. Achievement unlocked - What just happened there?
Congratulations on finishing the game and hopefully getting it all done in one go!
No comments:
Post a Comment